Product 7: Sterile Surgical Device
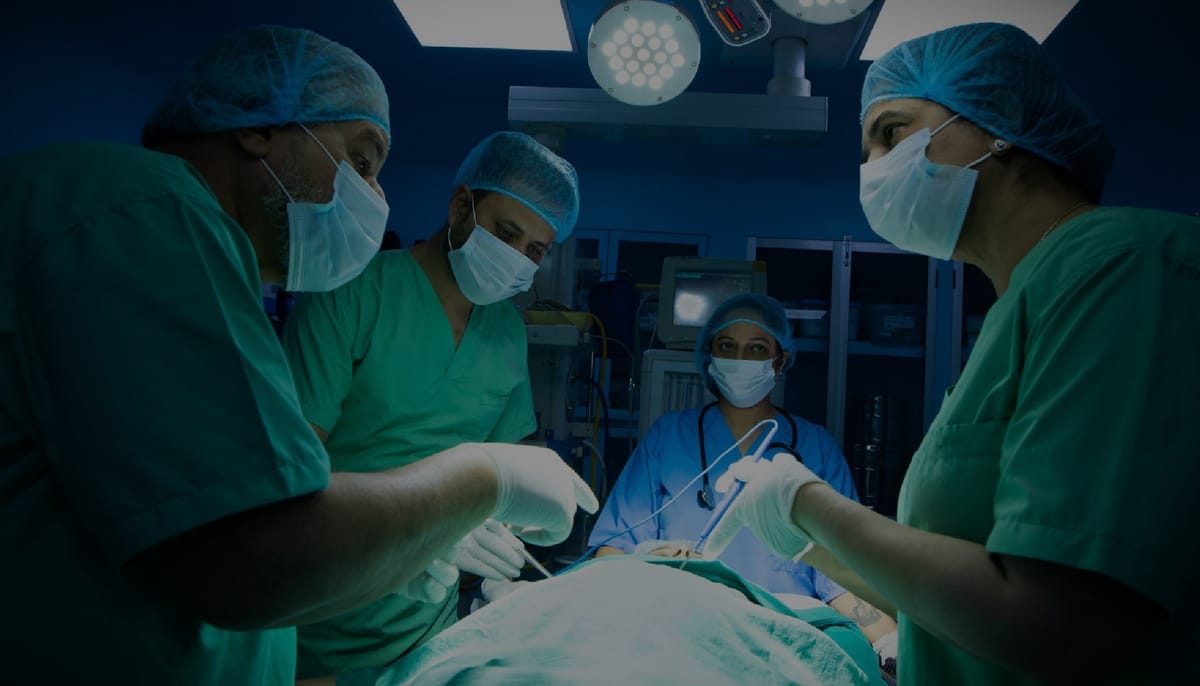
Over the last 2 years I have developed a surgical device alongside two remarkable neurosurgeons. After 200 prototypes, we have created a solution to a simple, yet pervasive problem present in the majority of brain and spine surgeries. A few of the milestones we achieved this month were submitting our patent and trademark applications, refining our go-to-market strategy, and pitching a venture capital investor for a Seed round of funding.
We'll be going forward in stealth mode until we finish our initial market trial in St. Louis, so sadly, I can't publicly share about the device itself for about a year. Instead, I will use this month's post to share some hard earned lessons in the domain of sterilization and sterile packaging of medical devices--a process that, at times, felt like an endless rabbit hole of (very expensive) testing and regulatory requirements.
In case you're interested in developing a medical device, or are curious about the steps a new surgical device must successfully navigate in order to be used in an operating room, here's a high level pass at the process.
The FDA & Medical Device Classifications
The Food and Drug Administration (FDA) is responsible for protecting the public health by assuring the safety, efficacy, and security of human and veterinary drugs, biological products, medical devices, our nation's food supply, cosmetics, and products that emit radiation. FDA.gov
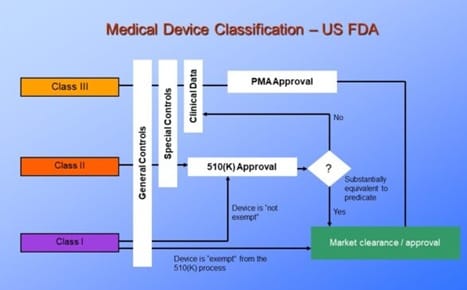
First up, you should know the FDA, the regulator of medical devices in the USA. It uses a classification system to represent the risk that a medical device poses to patients. The EU has it's own regulatory body called the European Medicines Agency (EMA).
FDA Class I to Class III Medical devices
Class I medical devices pose minimal risk to patients due to their limited contact and/or very high use and standardization. Examples include bandages, stethoscopes and scalpels. Even though scalpels are used to cut tissue, a very invasive process, they are very simple, used in very high numbers, and are produced in such a standardized process such that the FDA doesn't need to pay special attention to their manufacture or use.
Class II medical devices pose medium to high risk to patients. Examples include diagnostic equipment like MRI machines, catheters and contact lenses. For each of these, it is intuitive to see that they increase risk to a patient in the case of malfunction, or unexpected adverse effects.
Unless exempt, Class II devices are subject to 510(k) approval in which the new device must be tested and proven to be "substantially equivalent" to a comparable "predicate device." This Premarket Testing is submitted to the FDA for review and typically costs $20,000 to $100,000 depending on the complexity and risk of the device.
Class III medical devices pose the highest risk to patients. Examples include implanted pacemakers, stents, and ventilators. Devices in this category are often used to sustain life or prevent serious illness or injury. They must go through rigorous testing proving that their benefits significantly outweigh their risks to a patient's health before the FDA will grant Premarket Approval. The testing alone for these devices takes years and cost millions of dollars to progress through controlled performance testing, to testing in animal models, and finally in human clinical studies.
In order to determine that our device was Class II, 510(k) not required, and to document our rationale for this claim for the FDA, we hired an exceptional consultant: Melissa Walker, the President and CTO of Graematter. I also should mention our patent attorney, Joel Gotkin, from Oliff, PLC. I strongly recommend an attorney with a background in the domain of your invention and to spring for the cost of "prior art" searches. Joel's biomedical engineering background, and what we learned from his research informed the best strategy for creating a patent with a strategic spread of high probability of useful claims.
Once we had our Medical Device Classification identified the next step was to create our plan and validation strategy for repeatable manufacturing, packaging and sterilization. This was meant to ensure the device's physical components would be free from unwanted residual substances or microbial contamination that could present risk to a patient.
Manufacturing
For this device, the manufacturing process posed minimal risk, as I designed the product for 3D printing (Additive Manufacturing) with the intent to transition to injection molding once we have a first dose of real market feedback. I already employ this printed material and process in the production of sterilized surgical devices for an existing medical device OEM through my business, Prototyping Tech. Additionally, the chosen AM method—Stereolithography (SLA)—naturally incorporates an agitated alcohol wash and an extended UV bake as part of its required post-processing, further reducing microbial risk.
This brings us to the fascinating world of sterilization and sterile packaging. As I mentioned, even the process of packaging requires clear process design in service of patient safety. Every choice is something that you should be prepared to live with long-term if possible, because the sterilization and packaging validation testing of even a small device like ours can easily cost upwards of $50,000 and take 6+ months to complete.
Sterile Packaging
The only option that we gave significant consideration to for our device was a two sided sterile barrier with one side made of a clear polymer, and the other side an opaque semipermeable sheet (which is very often a medical version of Tyvek). These two sides are heat bonded together and come in two main versions.
- Peel pack: These typically have a clear poly-film on one side and Tyvek on the other. There are options available that use an adhesive closure, however, these have a high prevalence of failure in bubble testing, with potential for visually imperceptible closure gaps.
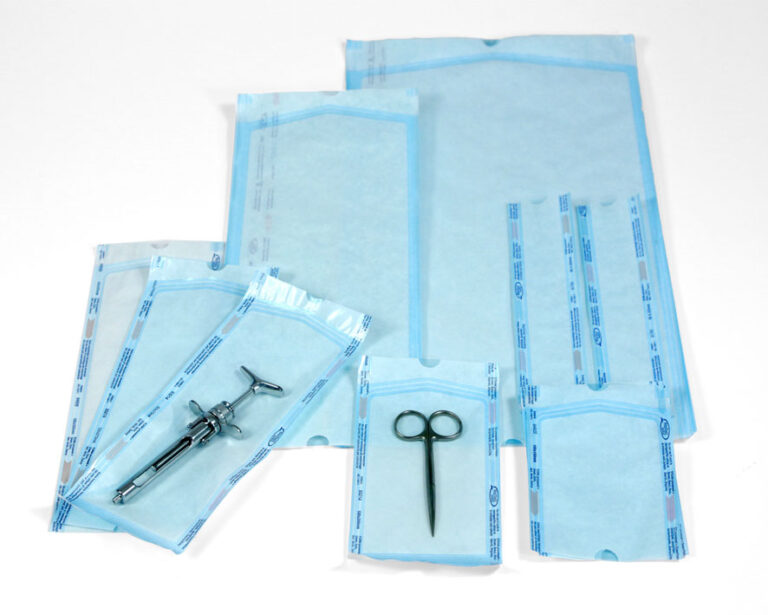
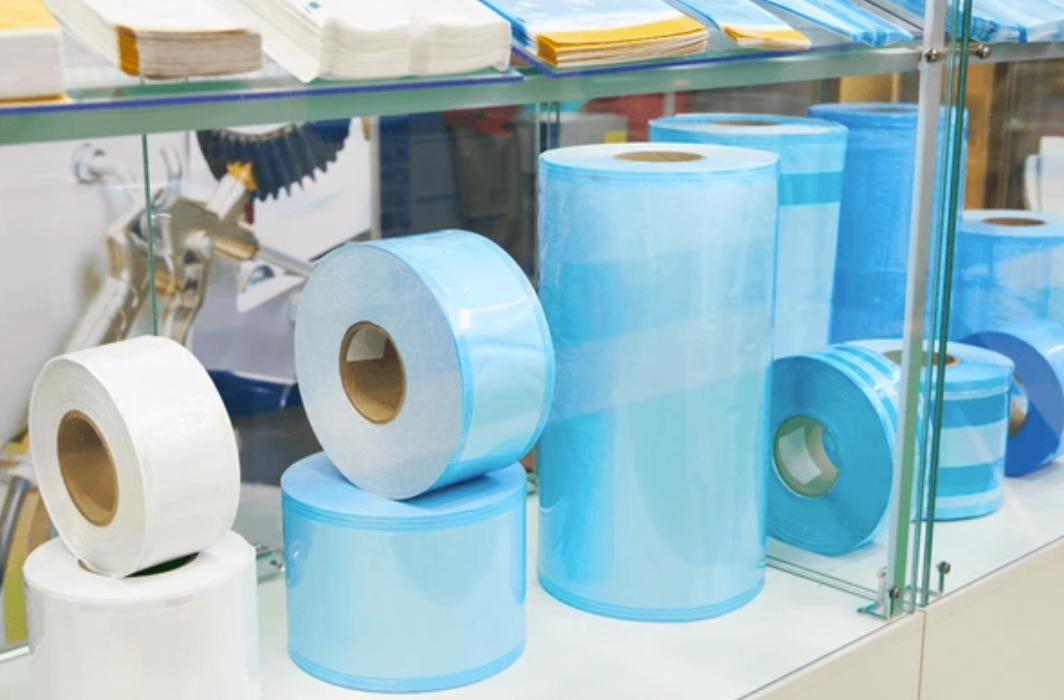
Images of traditional Peel Pack where both sides are made from flexible sheet material.
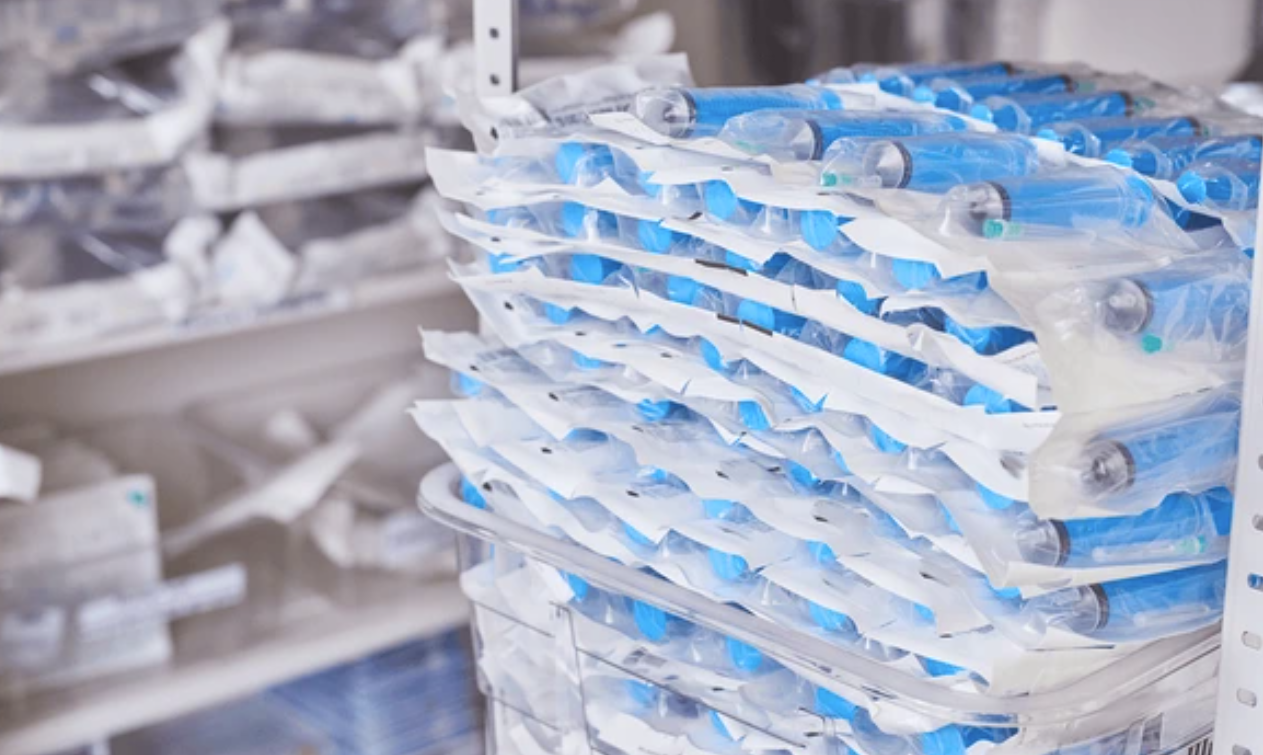
- Thermoformed Trays: This is the same concept as the Peel Pack, however, instead of a poly-film the Tyvek is bonded to a relatively rigid thermoformed polymer. This can offer much more protection for the enclosed device, and may be necessary if there are sharp elements.
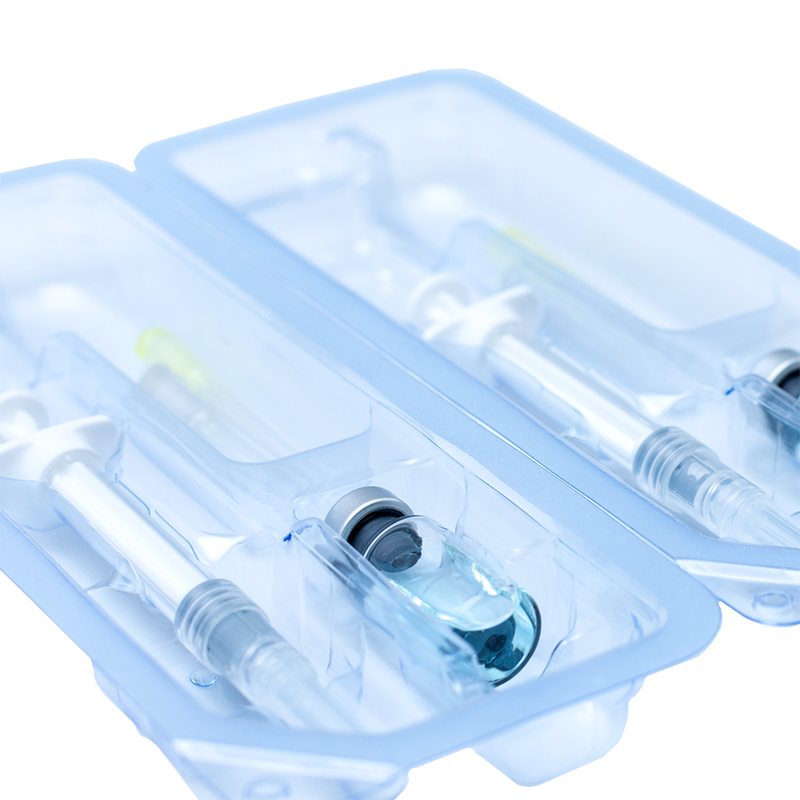
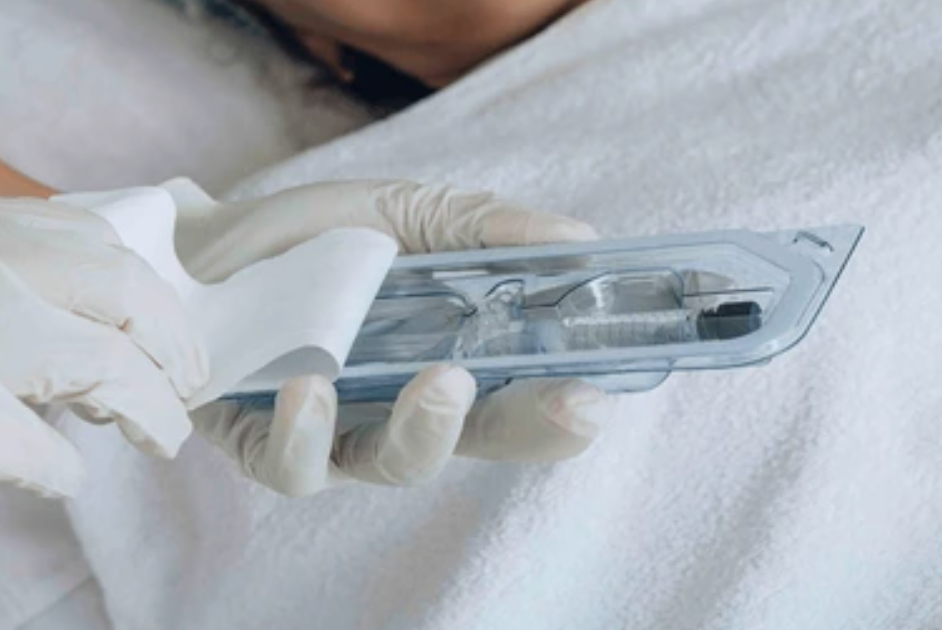
Images of thermoformed trays where a semipermeable barrier is bonded, making the seal.
There's also a middle path of regular peel pack with a tray or other holder fully placed within peel pack that directly maintains the position of the contained device(s).
Whatever sterile barrier is chosen, it must be compatible with the sterilization method used and maintain sterility through shipping, storage, and handling. Testing (accelerated aging, shipping simulations, bubble leak tests, etc.) can reach $40k for a comprehensive package.
With a sense of packaging we can take a look at actual sterilization methods. Autoclaves are a high temperature sterilization method that exposes the device to steam in a pressurized environment in order to kill microorganisms. Not all devices can take this type of exposure, however. Since our device is made of a polymer, it would likely unacceptably deform in an autoclave, so, we needed to look at Low Temperature Sterilization techniques.
Low Temperature Sterilization Methods
It turns out that for all of these low temperature sterilization methods, below, the device is packaged first and then put through the sterilization process. Sometimes the whole cardboard shipper box with regular packaging containing the actual sterile barrier and device pass through the sterilization process.
There are two main categories: Radiation Sterilization and Gas Sterilization.
Radiation Sterilization
Methods include Gamma, eBeam, and X-ray.
These forms of radiation penetrate both the product and its packaging, eliminating microorganisms in sealed boxes or trays.
Gamma irradiation typically uses nuclear reactive Cobalt 60 and circulates the fully packaged and boxed devices around the core for several hours depending on the exposure necessary. Exposure is measured in KiloGrays (kGy), for medical devices it is usually 25 to 40 kGy, with 25 often considered overkill.
eBeam Sterilization uses a planar curtain of electron beams and has the advantage of not requiring nuclear material (which is expensive, highly regulated, and may have a troublesome supply chain). However, eBeam sterilization is sensitive to the density and distribution of the material it is sterilizing, because the electrons that compose the beams have mass and are absorbed reletively quickly by the material they are passing through (whereas Gamma Rays are considered to be massless, and have much better ability to pass through matter).
Fun fact: Gamma irradiation isn’t just used in healthcare—it’s also used for aerospace durability testing (due to higher radiation levels in space) and even for sterilizing insects (try googling "Sterile Insect Technique" for a diabolical and environmentally friendly form of pest control).
Gas Sterilization
Gas Sterilization requires the semipermeable memberane (like the medical grade Tyvek I mentioned earlier). The devices are placed within the sealed packaging, placed in a chamber and are exposed to a gas which can permeate the sterile barier and kill any microorganisms that it comes in contact with.
Ethylene Oxide (EtO) is falling out of popularity with current findings and transitional guidance that the FDA is offering. Turns out it is not only toxic to the microorganisms that it effectively kills, it is a highly carcinogenic gas that can linger in the air and cause increased cancer prevalence in the human populations surrounding EtO plants.
Hydrogen Peroxide Vapor (H₂O₂), Chlorine Dioxide Gas, and Cold Plasma have been picking up development and popularity due to the issues with EtO. Each of these options offer some pros and cons, especially with respect to how the materials exposed to them may react. For Example, Hydrogen Peroxide vapor is not compatible with any type of cellulose, and any of these gases may cause discoloration or negative effects on the mechanical properties of different polymers and other materials.
Once the manufactured device has its design freeze, sterile packaging and sterilization method chosen, you then need to go through a testing process to develop the specific protocol and validate that it effectively sterilizes the device.
Validation Testing
Validation testing—determines the correct dosage, layout, setup, and process flow specific to the given sterilization method and vendor for your device. It is different for each sterilization modality, however, Lab testing is always necessary, which tends to have a starting point costing $20k–$30k and can take 8–24 weeks.
Be aware that the validation and testing steps may require sacrificing samples. If your device is expensive to produce, needing 100 units for testing can become a significant cost.
In summary, although it is expensive and time consuming, choosing and validating the manufacturing and handling protocols, sterile packaging and sterilization modality is a critical step in bringing safe, effective medical devices to market. (And also comply with the FDA). The good news is that of the dozen+ testing labs, packaging and sterilization vendors I've spoken with, every one has brought expertise, great customer service and a clear commitment to delivering a trustworthy sterilization solution.
Feel free to reach out to me directly if you would like introductions to the consultants, lawyers, sterilization vendors, packaging manufacturers or testing labs I've connect to. I'm always open to exchanging notes and learning from others in this field!
Lastly, if you are a brain/spine surgeon, or a member of the operating room team in these types of surgeries (eg. nursing or anesthesiology) in the St. Louis area, feel free to reach out. I'd love to share about our device and see if it could improve the vital work you do and improve your patient outcomes.